Unlock Hip Flexibility: 3 Advanced Yoga Poses for Backbends

Unlocking your hip flexibility is crucial for deeper backbends in yoga; this article explores three advanced poses—King Pigeon Pose (Eka Pada Rajakapotasana), Wheel Pose (Urdhva Dhanurasana), and Drop Backs—providing detailed instructions and modifications to safely enhance your practice.
Ready to dive deeper into your backbends? Unlocking Hip Flexibility: 3 Advanced Yoga Poses for Deeper Backbends is your guide to achieving greater range of motion and comfort in your yoga practice.
Understanding the Importance of Hip Flexibility in Yoga
Hip flexibility is not just about achieving advanced yoga poses; it’s about overall well-being and preventing injuries. When your hips are open and flexible, you’ll find that many yoga postures become more accessible and enjoyable. This section explores why hip flexibility is paramount for a fulfilling yoga journey.
The Connection Between Hips and Backbends
Tight hips can restrict your ability to perform backbends safely and effectively. When the hip flexors are tight, they pull the pelvis forward, which can cause compression in the lower back during backbends. Improving hip flexibility allows for a more even distribution of the bend throughout the spine.
Benefits Beyond the Mat
The benefits of hip flexibility extend beyond your yoga practice. Flexible hips can improve posture, reduce lower back pain, and enhance athletic performance. Opening your hips can also release emotional tension, as the hips are often considered a storehouse for stress and emotions.
- Improved posture and alignment
- Reduced risk of lower back pain
- Enhanced athletic performance in various sports
- Emotional release and stress reduction

Ultimately, improving hip flexibility is an investment in your overall health and well-being, both on and off the yoga mat. By incorporating targeted stretches and yoga poses into your routine, you can unlock the full potential of your body and mind.
King Pigeon Pose (Eka Pada Rajakapotasana): A Deep Hip Opener
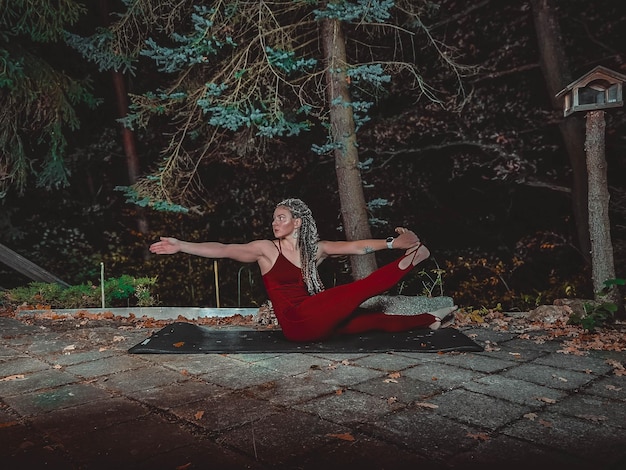
King Pigeon Pose, or Eka Pada Rajakapotasana, is a challenging yet rewarding pose that significantly improves hip flexibility. This pose not only stretches the hip flexors and psoas but also opens the chest and shoulders, promoting a sense of expansion and release.
Step-by-Step Instructions
Start on your hands and knees. Bring your right knee forward toward your right wrist, positioning your right ankle near your left wrist. The shin should be roughly parallel to the front of the mat, but this will vary based on your flexibility.
Slide your left leg back, straightening your knee and pointing your toes. Ensure your left hip is facing forward and square to the mat. Inhale and lengthen your spine, lifting your chest. Exhale and gently sink your hips toward the floor. Stay here for several breaths, focusing on relaxing into the pose.
For the full expression of the pose, bend your left knee and reach back with your left hand to grab your foot. If you can’t reach your foot, use a strap. Once you have a hold of your foot, rotate your shoulder open and draw your foot closer to your head. Hold for several breaths, then release and repeat on the other side.
Modifications and Variations
If you’re new to King Pigeon Pose, there are several modifications you can try. Place a blanket or block under your right hip to support your body. You can also keep your back leg straight on the floor without attempting to grab your foot. Using a strap to reach your back foot is an excellent way to gradually deepen the pose.
- Use a blanket under the hip for support
- Keep the back leg straight without reaching for the foot
- Use a strap to assist in reaching the back foot
Regular practice of King Pigeon Pose, with mindful attention to alignment and breath, will gradually increase your hip flexibility and prepare you for deeper backbends.
Wheel Pose (Urdhva Dhanurasana): Bridging to Backbend Bliss
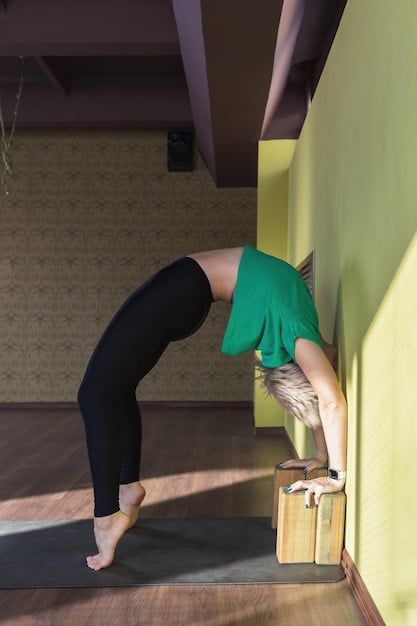
Wheel Pose, or Urdhva Dhanurasana, is a powerful backbend that also requires significant hip flexibility. This pose strengthens the back muscles, opens the chest and shoulders, and stretches the hip flexors, creating a deep sense of openness and vitality.
Entering Wheel Pose Safely
Lie on your back with your knees bent and your feet flat on the floor, hip-width apart. Place your hands beside your ears, with your fingertips pointing toward your shoulders. Ensure your elbows are pointing straight up toward the ceiling.
Press firmly into your feet and hands, and on an inhale, lift your hips off the floor. Continue to lift, arching your back and straightening your arms as much as possible. Your head can either hang loosely or you can gently tuck your chin toward your chest.
Hold the pose for several breaths, focusing on engaging your core and glutes to support your back. To exit the pose, slowly lower your back down to the floor, one vertebra at a time. Rest for a few breaths before repeating.
The Role of Hip Engagement
Engaging your hip muscles properly in Wheel Pose is crucial for protecting your lower back. Focus on squeezing your glutes and drawing your thighs inward to maintain proper alignment and prevent unnecessary strain. Actively pushing your hips up and forward helps to deepen the backbend while distributing the effort more evenly throughout your body.
- Engage glutes to protect the lower back
- Draw thighs inward for proper alignment
- Push hips up and forward to deepen the backbend
Practicing Wheel Pose regularly, with attention to proper alignment and muscle engagement, can greatly improve your backbending abilities and overall hip flexibility.

Drop Backs: Advanced Technique for Enhanced Flexibility
Drop Backs are an advanced yoga technique used to transition into a backbend from a standing position. This method requires a high degree of hip flexibility, core strength, and body awareness.
Mastering the Transition
Begin in Tadasana (Mountain Pose) with your feet hip-width apart and your arms overhead. Ground down through your feet and engage your core. Inhale deeply, lengthening your spine and reaching up toward the ceiling.
As you exhale, slowly begin to arch backward, keeping your thighs engaged and your core active. Allow your arms to follow the natural curve of your spine, reaching back toward the floor. Keep your gaze forward as long as possible, then slowly allow your head to drop back.
Once your hands reach the floor, walk them closer to your feet, deepening the backbend. Hold for several breaths, then slowly reverse the movement to return to a standing position. Use your core strength to support your back as you come up.
Preparatory Poses
Before attempting Drop Backs, ensure you have a solid foundation in basic backbends like Bridge Pose and Camel Pose. These poses will help you build the necessary strength and flexibility to safely perform Drop Backs. Regular practice of hip-opening stretches, such as Pigeon Pose and Butterfly Pose, is also essential.
Tips for Safety
It’s crucial to practice Drop Backs under the guidance of an experienced yoga instructor. This will help you learn the correct technique and avoid injury. Start slowly and gradually increase the depth of your backbend as your flexibility improves. Always listen to your body and stop if you feel any pain.
- Practice under experienced guidance
- Start slowly and gradually increase depth
- Listen to your body and stop if there is pain
Regular practice of Drop Backs, with proper guidance and attention to safety, can significantly enhance your hip and spinal flexibility, leading to deeper and more fulfilling backbends.
Integrating Poses into Your Practice
Incorporating these three advanced yoga poses into your regular practice can lead to significant improvements in hip flexibility and backbending ability. However, it’s crucial to approach these poses with awareness, patience, and respect for your body’s limitations.
Creating a Balanced Sequence
When designing your yoga sequence, start with gentle warm-ups to prepare your body for deeper stretches. Include poses that target the hip flexors, hamstrings, and spine, such as Sun Salutations, Warrior poses, and seated forward folds. Gradually introduce the more challenging poses, like King Pigeon, Wheel, and Drop Backs, as your body becomes more open and receptive.
Listening to Your Body
One of the most important aspects of yoga is listening to your body. Pay attention to any sensations of pain or discomfort, and modify the poses as needed. It’s better to err on the side of caution and avoid pushing yourself too far, especially when practicing advanced poses.
Consistency is Key
Consistency is essential for making progress in your yoga practice. Aim to practice regularly, even if it’s just for a few minutes each day. Over time, you’ll notice significant improvements in your flexibility, strength, and overall well-being.
- Start with gentle warm-ups
- Listen to your body and modify as needed
- Practice consistently for best results
By integrating these advanced yoga poses mindfully and consistently into your practice, you can unlock greater hip flexibility and achieve deeper, more fulfilling backbends.
Common Mistakes to Avoid
Even experienced yogis can fall into common traps when trying to attempt challenging poses. Understanding potential pitfals can assist you in avoiding the likelihood of injury.
Forcing the Pose
One of the biggest mistakes is trying to push your body too far, too soon. Forcing a pose can lead to muscle strains, joint pain, and even more serious injuries. Remember that yoga is about progress, not perfection. Focus on gradual improvement and be patient with your body.
Ignoring Pain Signals
It’s important to distinguish between stretching sensations and pain. Mild discomfort is normal when stretching, but sharp or intense pain is a sign that something is wrong. If you experience pain, back off from the pose and investigate whether or not a physical limitation is present.
Holding Your Breath
Breath is an integral part of yoga, and holding your breath can restrict your movement and increase tension in your body. Focus on taking deep, slow breaths throughout your practice, especially during challenging poses.
- Avoid forcing poses
- Differentiate between stretching and pain
- Maintain continuous breath
You can safeguard your body and guarantee a successful and fulfilling progression by avoiding these pitfalls and being conscious throughout your practice.
Advanced Tips for Deeper Backbends
As you advance in your yoga journey, it’s natural to seek ways to deepen your backbends and explore the full potential of your practice. Here are a few advanced tips to help you take your backbends to the next level.
Engaging the Core Intentionally
Activating your core during backbends helps to stabilize your spine and prevent compression in the lower back. Focus on drawing your navel in toward your spine and engaging your abdominal muscles throughout the pose. It is also important to use your core when exiting poses.
Utilizing Breath Techniques
Certain breath techniques, such as Ujjayi breath (Victorious Breath), can help you access deeper levels of relaxation and openness in your backbends. Ujjayi breath involves gently constricting the back of your throat as you inhale and exhale, creating a soft, ocean-like sound. This technique can help to calm your mind and deepen your connection to your body.
- Engage core for spinal support
- Use Ujjayi breath to deepen relaxation
With practice and dedication, you can gradually deepen your backbends and unlock new levels of flexibility and strength.
| Key Point | Brief Description |
|---|---|
| 🧘♀️ King Pigeon Pose | Deep hip opener; stretches hip flexors and psoas. |
| 💪 Wheel Pose | Backbend, strengthens back, opens chest, stretches hips. |
| 🤸 Drop Backs | Advanced; transitions to backbend from standing, requires hip flexibility. |
| 🧘 Safety First | Listen to your body, avoid forcing poses, and breathe deeply. |
Frequently Asked Questions
▼
Hip flexibility allows for a deeper and safer backbend by distributing the bend evenly throughout the spine. Tight hips can cause lower back compression, increasing the risk of injury.
▼
Aim to practice these poses 2-3 times per week, incorporating them into a well-rounded yoga routine. Consistency is key, but always listen to your body and avoid overexertion.
▼
Use a strap to bridge the gap between your hand and foot. As your flexibility improves, you’ll gradually be able to shorten the strap and eventually grab your foot directly.
▼
Wheel Pose may not be suitable for individuals with certain medical conditions, such as back injuries, high blood pressure, or glaucoma. Consult with a healthcare professional before attempting this pose.
▼
Focus on building a strong foundation in basic backbends, practice hip-opening stretches regularly, and always work with an experienced yoga instructor to ensure proper technique and safety.
Conclusion
Unlocking hip flexibility is a journey that requires dedication, patience, and mindful attention. By incorporating these three advanced yoga poses—King Pigeon Pose, Wheel Pose, and Drop Backs—into your practice, you can gradually deepen your backbends and experience the many benefits of increased flexibility and strength. Remember to listen to your body, practice with awareness, and seek guidance from experienced instructors to ensure a safe and fulfilling yoga journey.


